Doctor Consultation & Clinical Care (CPOE)
This section describes the workflow for medical practitioners conducting outpatient consultations, documenting structured 3-step encounters, assigning ICD-10 diagnoses, checking formulary stock, authoring electronic prescriptions with digital signatures, and placing laboratory and imaging orders.
1. Before You Begin
- Authorized Roles: Attending Doctor, Specialist, Surgeon, Medical Officer.
- Clinical Principle: All consultations update the patient's continuous longitudinal medical record. Prescriptions are validated in real time against formulary stock availability.
2. Step-by-Step Clinical Consultation Workflow
graph LR
    A[1. Review Patient Chart] --> B[2. Document Encounter: SOAP & ICD-10]
    B --> C[3. Place Orders: Rx, Labs, Imaging]
    C --> D[4. Finalize & Sign Off Encounter]
Step 1: Pre-Consultation Chart Review
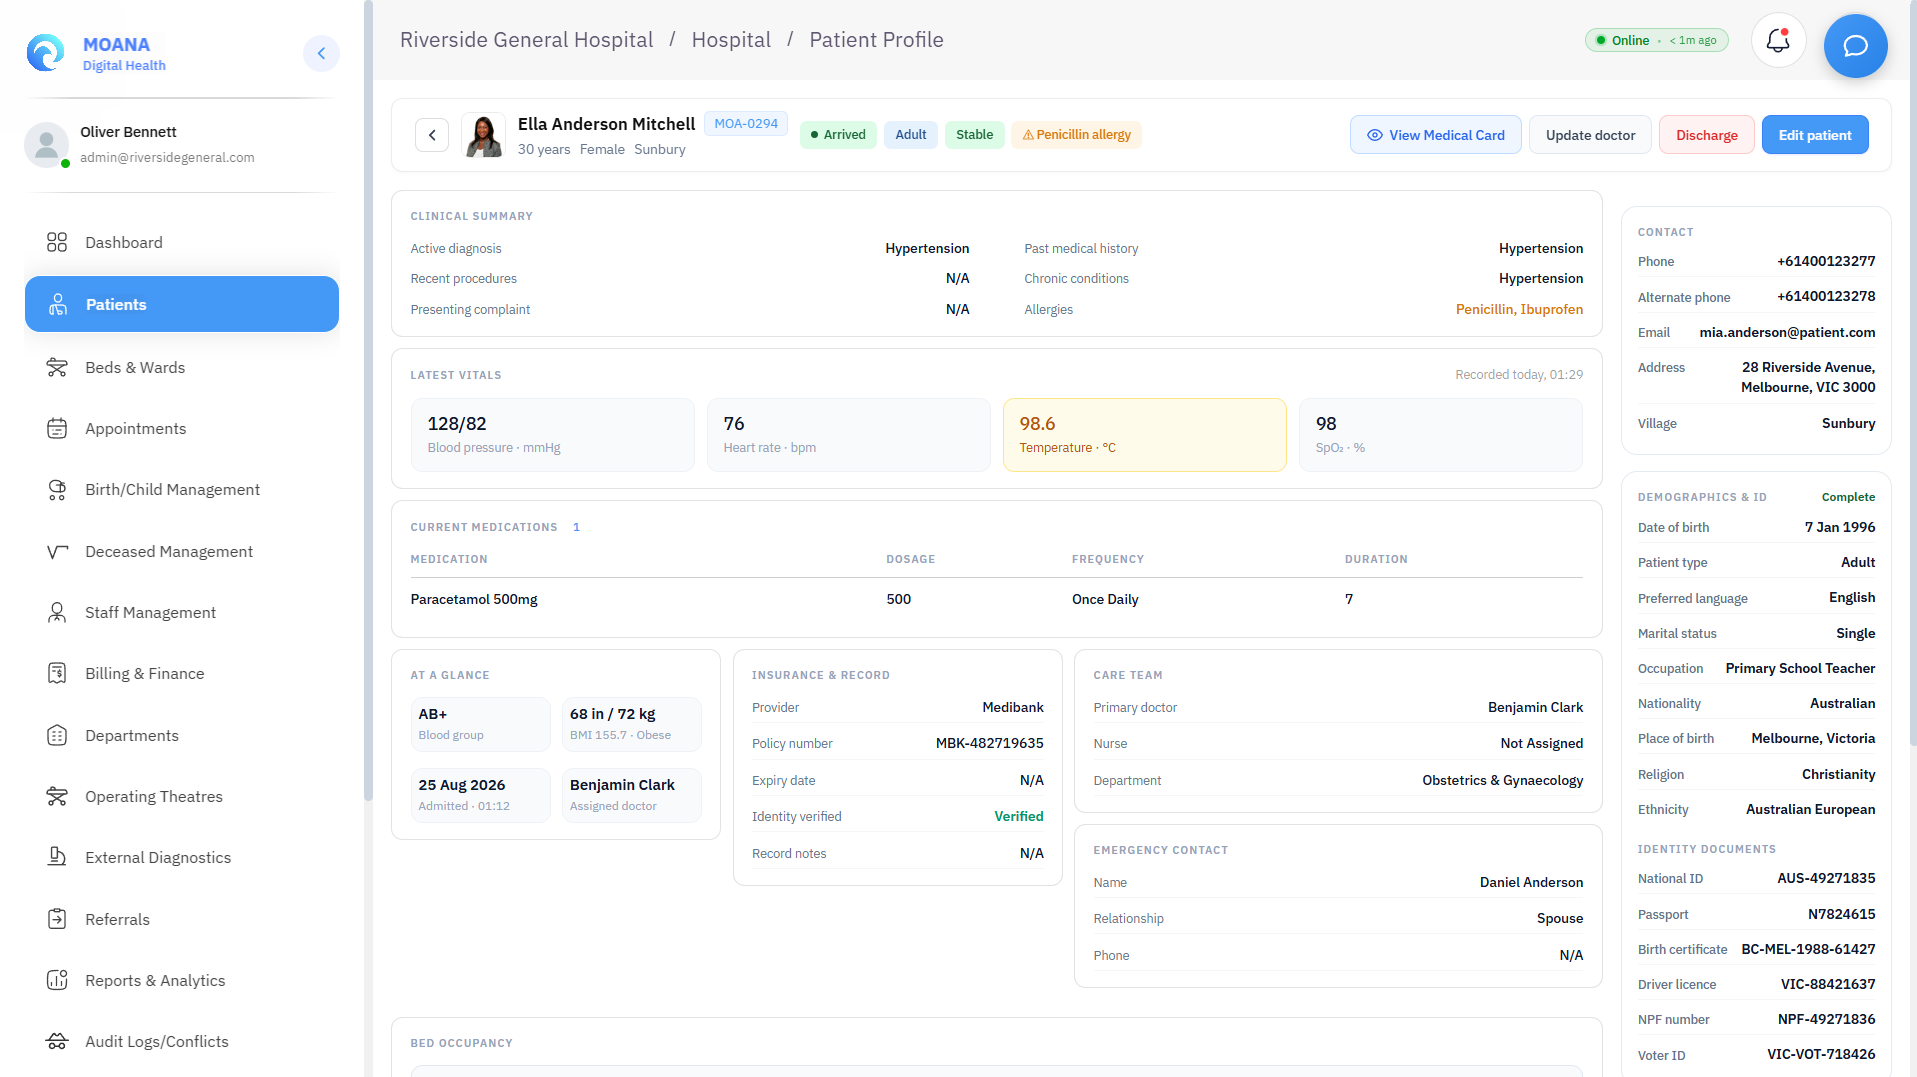
Before writing a single note or placing any clinical order, perform the pre-consultation review:
- Patient Banner Verification: Confirm patient's name, date of birth, and Moana Patient ID on the banner at the top of the screen.
- Allergy Check: Review the active allergy list on the banner — note any documented allergies before prescribing.
- Medications Review: Review current active medications on the Medications tab.
- Pending Results: Check pending diagnostic results in the Results tab — verify if new results returned since the previous encounter.
- Clinical History: Review the problem list, past diagnoses, and previous SOAP notes.
Step 2: SOAP Note — Structured Clinical Documentation
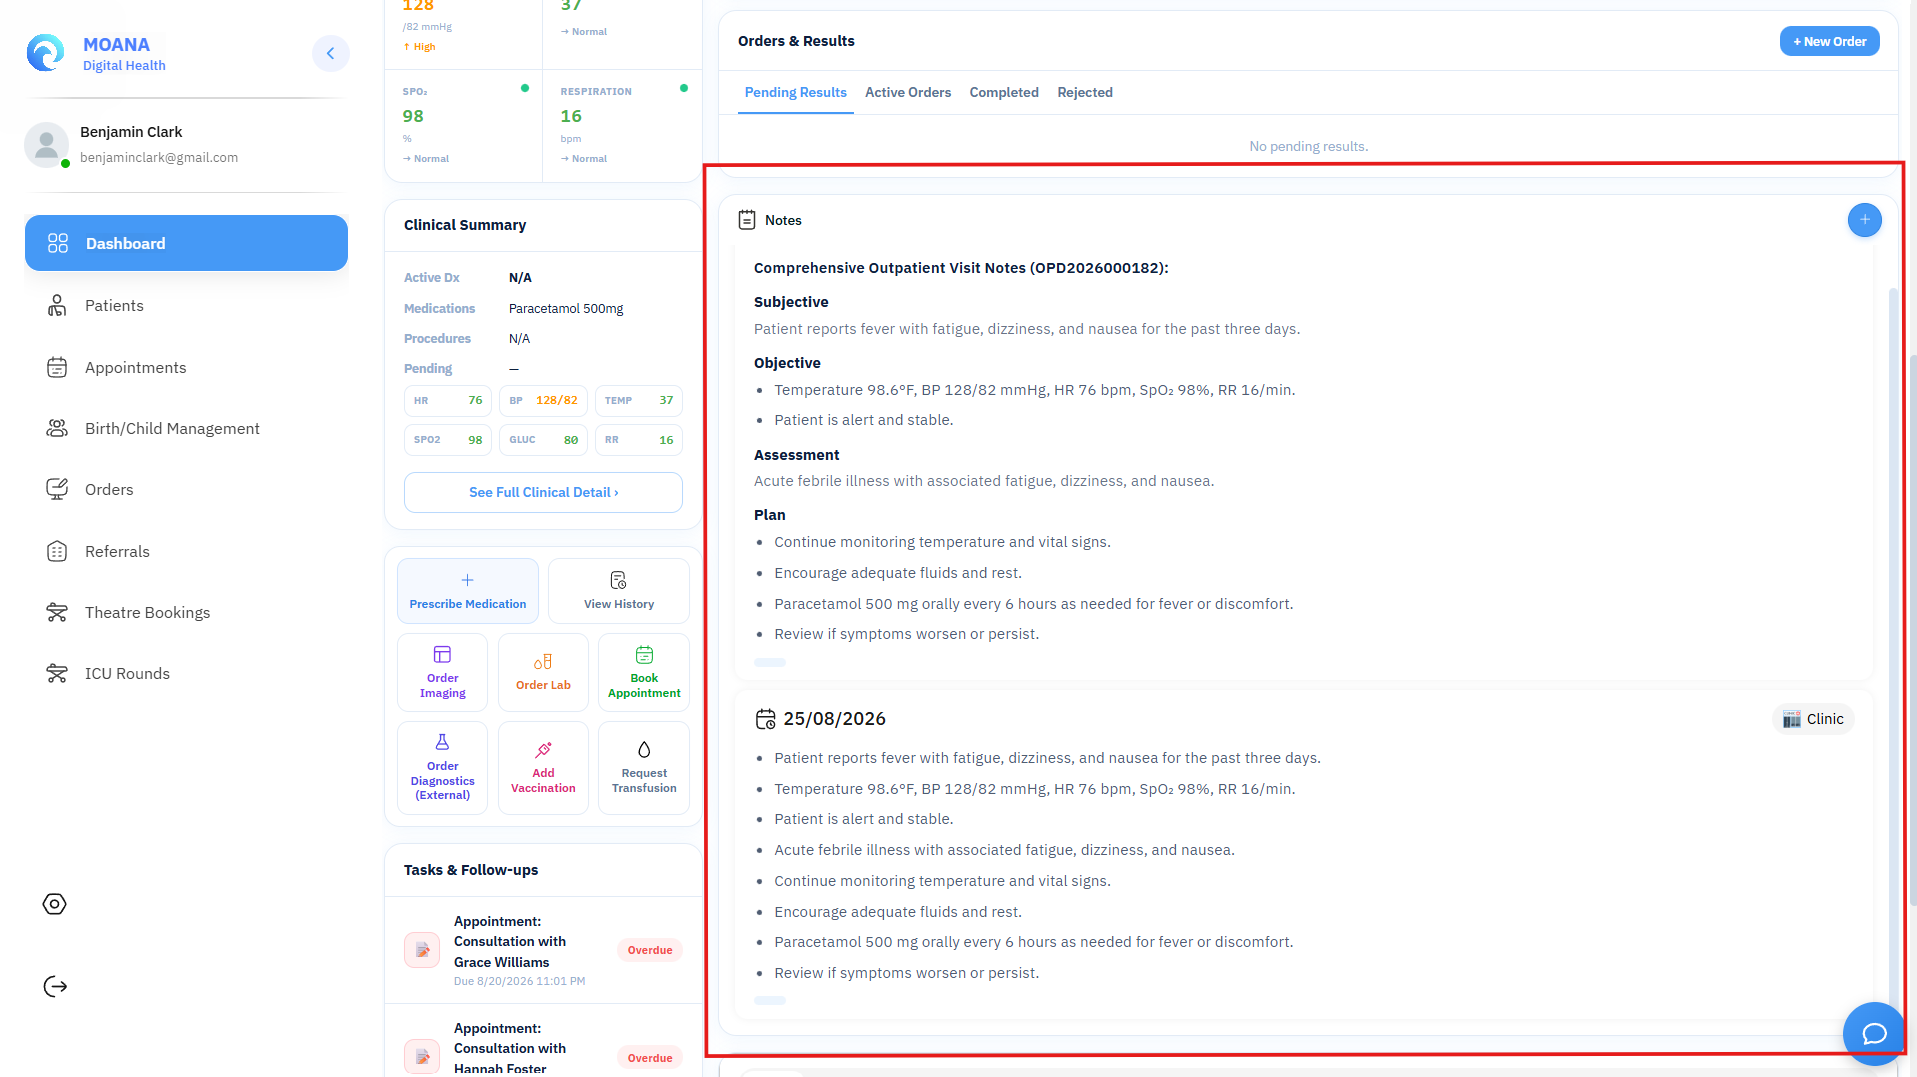
Click + New Visit / Consultation / SOAP Note to open a new clinical encounter:
- SUBJECTIVE: Document patient's reported symptoms in their own words — onset, duration, character, and associated complaints.
- OBJECTIVE: Document physical examination findings, vital signs, and observed clinical appearance.
- ASSESSMENT: Enter the ICD-10 coded diagnosis. Type a keyword or code to select from the pre-loaded formulary list. Free-text diagnosis is not accepted as the official coded entry. Optional: enter pain score (0–10).
- PLAN: Detail treatment plan, orders to be placed, disposition decision, and follow-up instructions.
SOAP Note Rule: All Four Sections Required The system strictly enforces that all four sections (Subjective, Objective, Assessment, Plan) must be non-empty before the note can be submitted. ICD-10 diagnosis coding is mandatory in the Assessment section. If a section cannot be clinically completed, document the clinical reason why within that section.
Step 3: Unified Order Entry — Prescriptions, Lab, Imaging & Referrals
All clinical orders are placed from the unified Orders screen:
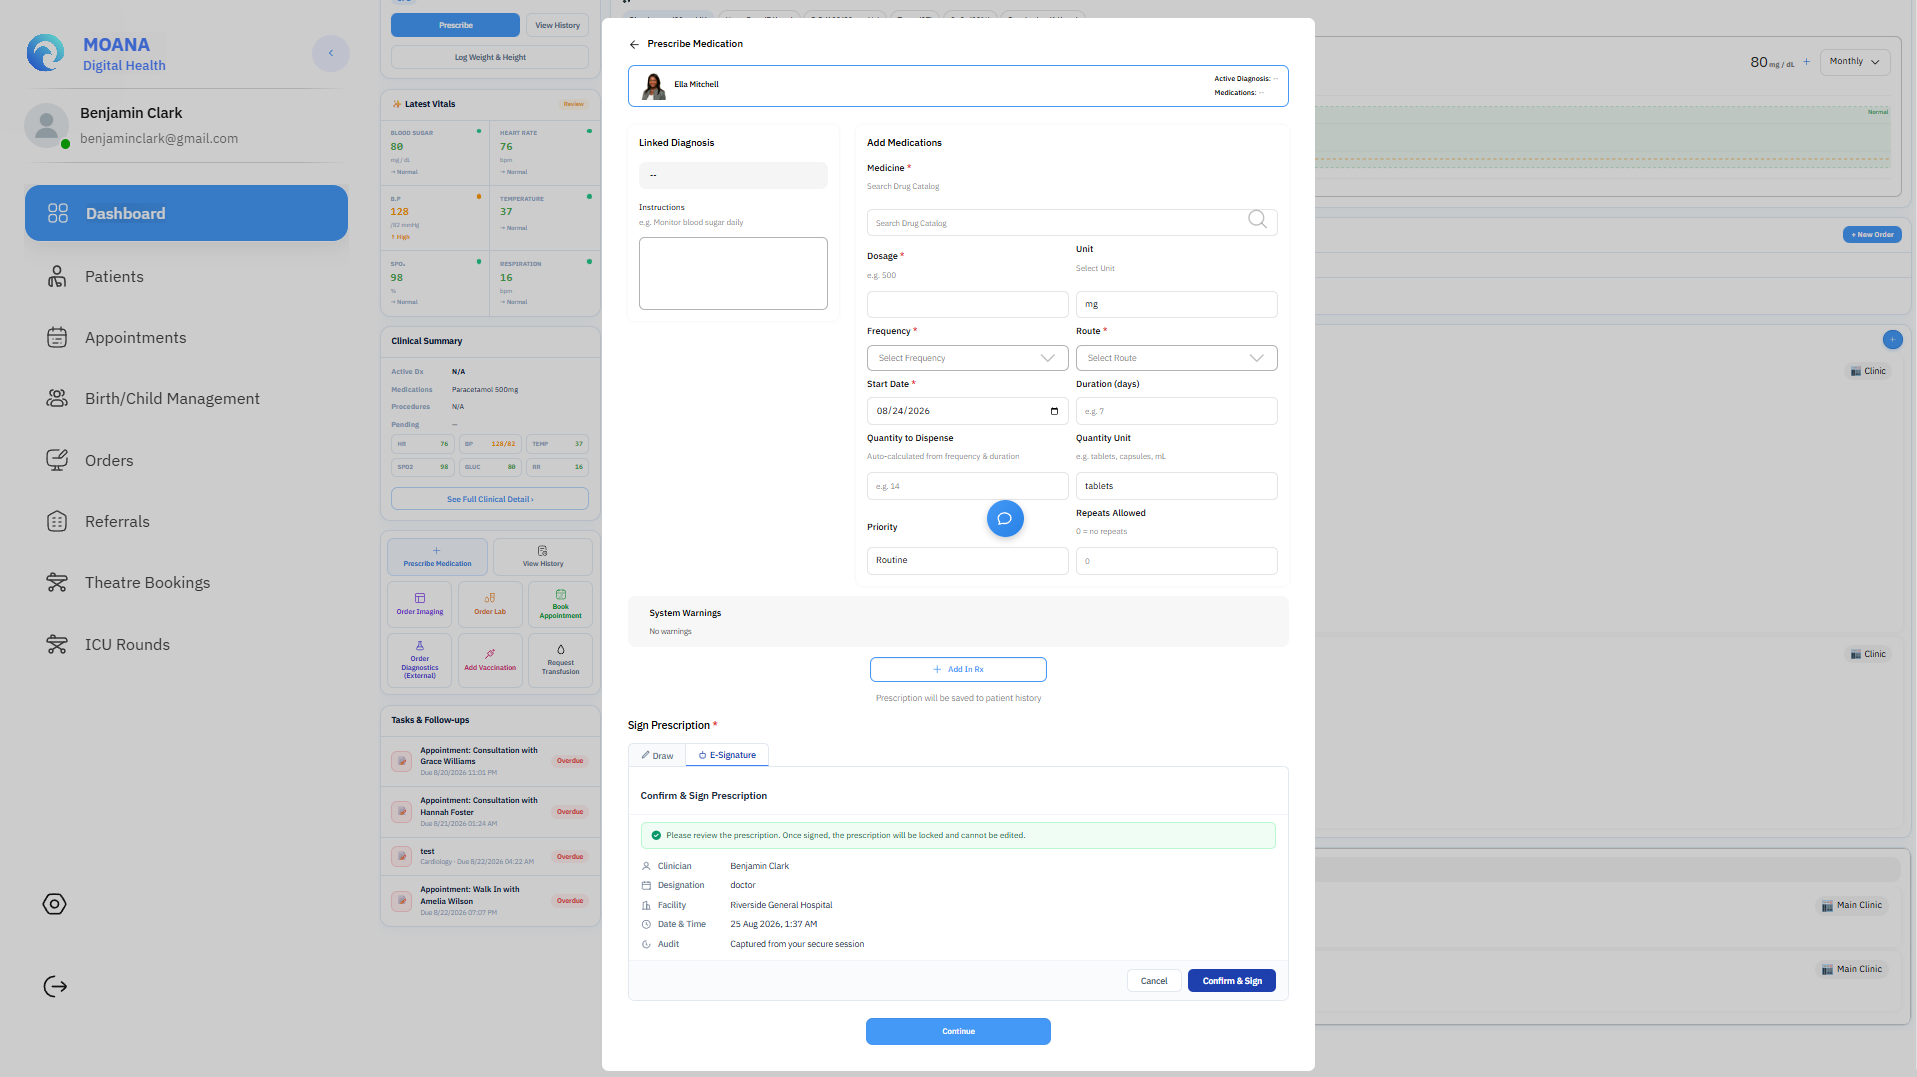
D1 — Electronic Prescriptions
- Click Prescriptions → + Prescribe Medication.
- Select the drug from the hospital formulary. Enter dosage, route, frequency, and duration.
- The system checks for drug-allergy and drug-drug interactions, displaying warnings in the System Warnings panel.
- Prescribing Advisory vs Dispensing Gate: Warnings at prescribing are advisory — they do not block signing. The enforced hard-stop gate is at the Pharmacy dispensing stage. Always review patient allergies.
- Authorize using the digital signature pad. The prescription enters the Pharmacy Dispensing Queue.
D2 — Laboratory Orders
- Click + Order Lab Test. Select the test from the LOINC-coded laboratory catalog.
- Set priority:
Routine,Urgent, orSTAT. - Enter clinical indication (mandatory — transmits to Moana-LIS via FHIR ServiceRequest).
- Important Connectivity Rule: Laboratory orders cannot be placed while the workstation is offline — the request fails outright. Use paper lab request forms during connectivity outages.
D3 — Diagnostic Imaging Orders
- Click + Order Imaging. Select modality (
X-Ray,CT,Ultrasound,MRI). - Enter clinical indication and contrast requirements.
- Order appears on the Radiology worklist and links to PACS studies.
D4 — Specialty Referrals
- Click Refer. Select the receiving clinical specialty or referral health facility.
- Enter clinical indication and urgency level. The referral routes to the receiving team's intake queue.
Step 4: Reviewing Results & Critical Result Acknowledgment
Results from laboratory and radiology appear in the patient's Results tab once verified and released:
Patient Safety Checkpoint: Critical Result Acknowledgment When a critical laboratory or radiology notification appears:
- Respond immediately. Open the result, review values, and confirm patient's clinical status.
- Acknowledge the alert in the system.
- Follow direct verbal communication protocols with the diagnostic department regardless of electronic acknowledgment.
3. Clinical Training Scenario
Scenario D1 — Known Allergy at Prescribing
- Clinical Setup: Doctor opens the chart of a patient with a documented penicillin allergy and attempts to prescribe amoxicillin.
- System Action: System displays a drug-allergy advisory banner in the System Warnings field.
- Doctor Action: Doctor reviews advisory, recognizes cross-reactivity, and selects an alternative (e.g., Azithromycin).
- Expected Outcome: Advisory displayed; safe alternative prescribed; order routes to pharmacy without a dispensing hard stop.
Step 6: Patient Disposition & Encounter Sign-Off
- Determine patient disposition:
- Discharge Home: Prescribe take-home medications and schedule follow-up.
- Inpatient Admission: Select target ward and care level.
- Inter-Facility Referral: Package clinical summary and transmit to referral center.
- Surgical Theatre: Book operating theatre suite.
- Click Finalize Encounter.
3. Workflow Result & Departmental Handoff
The clinical encounter is permanently committed to the longitudinal medical record. Prescriptions populate the Pharmacy Clinical Verification Queue; Lab orders route to LIS Sample Collection; and Inpatient requests appear on the Bed Command Center.